How to Remove Candle Wax from Carpet and Upholstery
Candles can make a space feel warm and welcoming, but spilled wax creates a stubborn mess fast. If wax gets pushed deeper into carpet fibers or fabric, cleanup becomes harder, and the stain can spread. Facility managers and cleaning teams need a simple method that removes the wax without making the problem worse. When you know the right steps, you can handle the spill with less damage, less wasted time, and better results.
Step by Step Candle Wax Removal Procedure
1. Let the Wax Harden Completely
Start by leaving the wax alone until it is solidified. Do not wipe it while it is still soft. Soft wax smears into the carpet or upholstery, spreading the problem over a larger area.
2. Remove as Much Surface Wax as Possible
Once the wax hardens, scrape away the excess with a bone knife, a dull scraper, or even a credit card. Work carefully from outside toward the middle so you lift the wax without damaging the fibers or fabric or spreading the stain. After scraping, vacuum up the loose pieces to clear the area before moving to the next step.

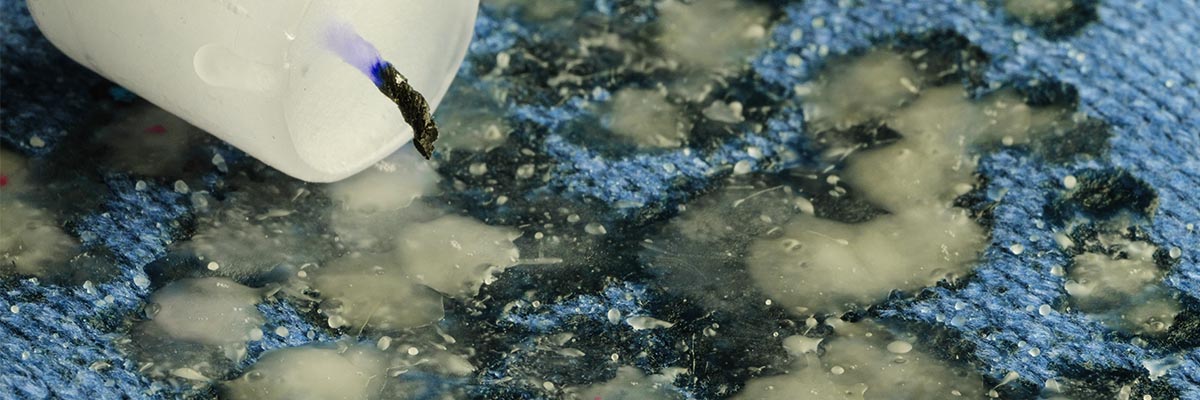
3. Use Hillyard Quick and Clean Gum Go if the Wax Is Still Soft
If part of the wax remains soft or sticky, use Hillyard Quick and Clean Gum Go to harden it. This product works by freezing the material to about 40 degrees below zero, which makes the wax brittle so you can crack and scrape it away more easily. It also leaves no stains or chemical residue, making it useful for wax, gum, putty, and other gummy soils. Spray only as directed, keep it off your skin, and scrape the wax while it is hard and brittle.
4. Cover the Remaining Stain with a Clean White Cloth
After you remove the bulk of the wax, place a clean white cloth over the remaining residue. The cloth acts as a transfer surface. It pulls the softened wax away from the carpet or upholstery during the next step.
5. Apply Steady Heat with a Warm Iron
Use an iron set to medium heat and move it slowly over the cloth. Keep the heat steady and controlled. As the wax warms, it transfers from the surface into the cloth.
6. Change to a Clean Section of Cloth as Needed
Do not keep using the same wax filled area of the cloth. Move to a clean section each time so you do not transfer wax back into the surface. Repeat the process until the remaining residue is gone.
7. Inspect the Area
Check the carpet or upholstery closely after the wax is removed. Look for any remaining residue, and repeat the cloth and iron step if needed. A careful final check helps you avoid leaving a dull or sticky spot behind.
Why Does This Method Work?
This process works because it handles wax in two stages. First, you harden and remove the bulk of the spill. Then you use heat to lift the remaining residue into a clean cloth. That approach keeps you from grinding wax deeper into the material and gives you better control over the cleanup.
Contact Hillyard for Any Cleaning Challenge
Candle wax looks difficult to remove, but the right process makes the job manageable. When you let the wax harden, remove the excess, use Hillyard Quick and Clean Gum Go when needed, and finish with a clean cloth and warm iron, you can clean carpet and upholstery with confidence. If you are dealing with stubborn spills or other cleaning problems, use the form below to contact Hillyard. Our experts can help you work through your cleaning challenges and choose the right approach for the job.
Frequently Asked Questions
Can I Wipe Candle Wax as Soon as It Spills?
No. Wiping soft wax spreads it and pushes it deeper into carpet fibers or fabric. Let it harden first, then scrape and vacuum the loose material.
What Does Gum Go Do to the Wax?
Gum Go freezes the wax until it becomes hard and brittle. That makes it much easier to crack and scrape away before you use heat to remove the final residue.
Can I Use Any Cloth for the Iron Step?
Use a clean white cloth. A white cloth helps you avoid color transfer, and a clean section prevents melted wax from returning to the surface.